Table of Contents

Salt-Water Batteries teacher's guide
Background Information
Experiments/Demos/Building
Experiment: Salt Water Battery: How to Make the Cells
The salt water batteries are main building task in the lesson. Each pair of students should build one salt-water battery “cell”. These cells are connected together to make batteries. Each cell consists of the following materials:
- One aluminium drinks can, with the top cut off and the outside sanded down.
- Water (enough to almost fill the can)
- Salt (2 or 3 tablespoons for each can)
- Charcoal, crushed into powder or small pieces. About 2 tablespoons per can.
- A small square of cloth, 2 inches on each side
- An elastic band
- Two coated electrical wires, each about 6” long
- One plastic bottle or container, slightly larger than the can. If the cans can be sanded on the INSIDE, this can be excluded.
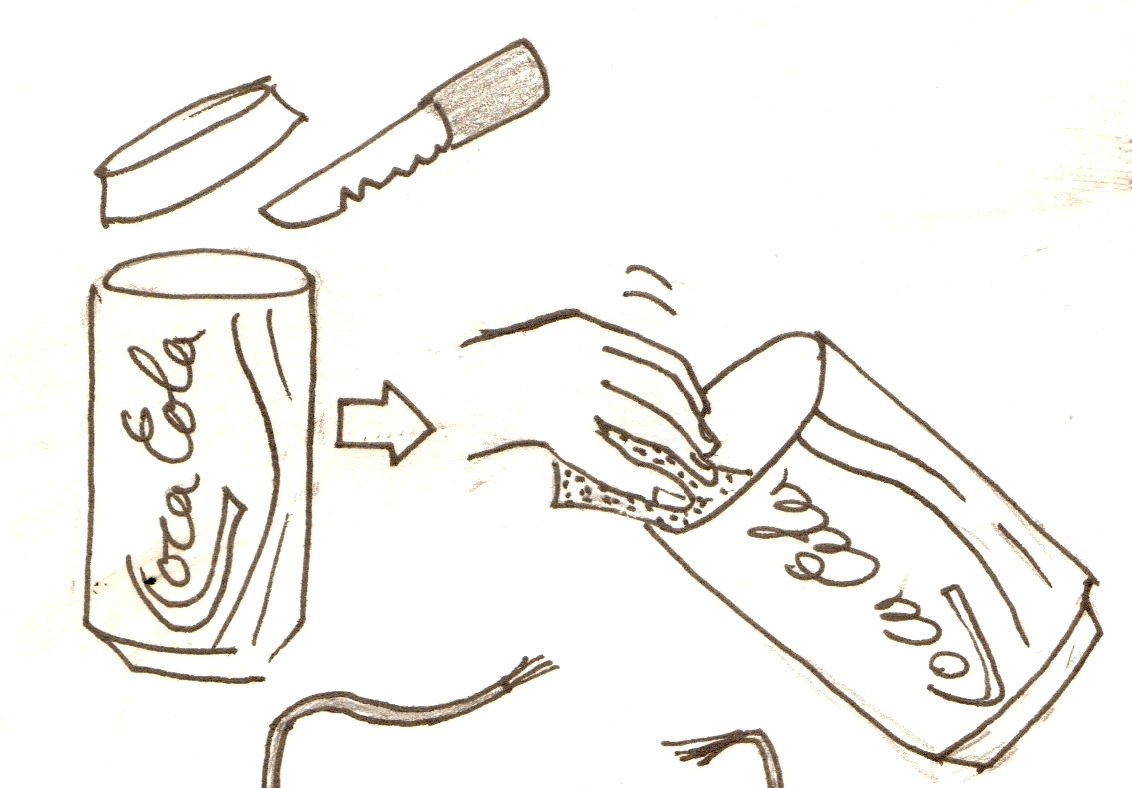
The cans need to be sanded because most drink cans are coated with a thin layer of plastic. If the plastic is not sanded off the aluminium will not react, and the batteries will not work. It is easiest to sand the outside of the cans. However, if you can manage to sand the inside of the cans well, you do not need the plastic bottle.
How to build one salt water cell
If cans can be sanded on the inside:
1. Cut off the top of the can, sand down the inside walls
2. Make two cuts down from the top of the can, about half an inch apart, to make a tab
If cans can only be sanded on the outside:
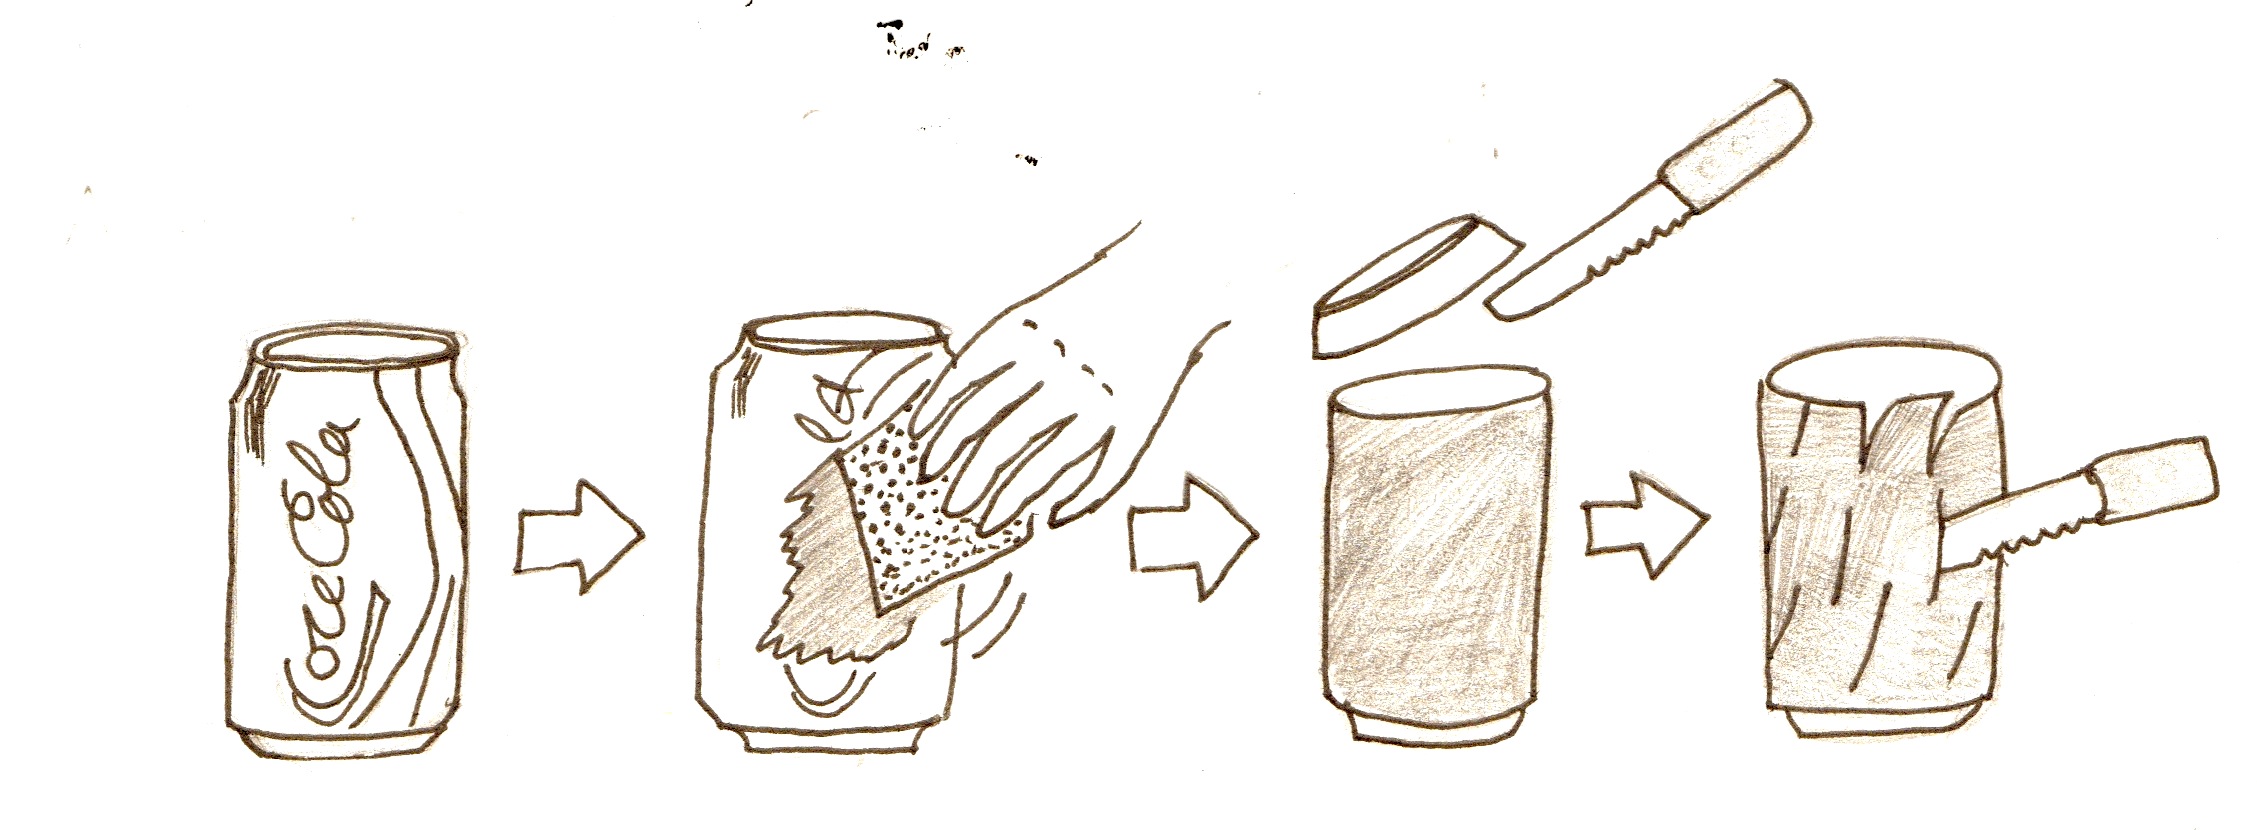
- Sand down the outside of the can
- Cut off the top
- With a knife, cut small slits (about 1 inch long) all over the can
- Make two cuts down from the top of the can, about half an inch apart, to make a tab
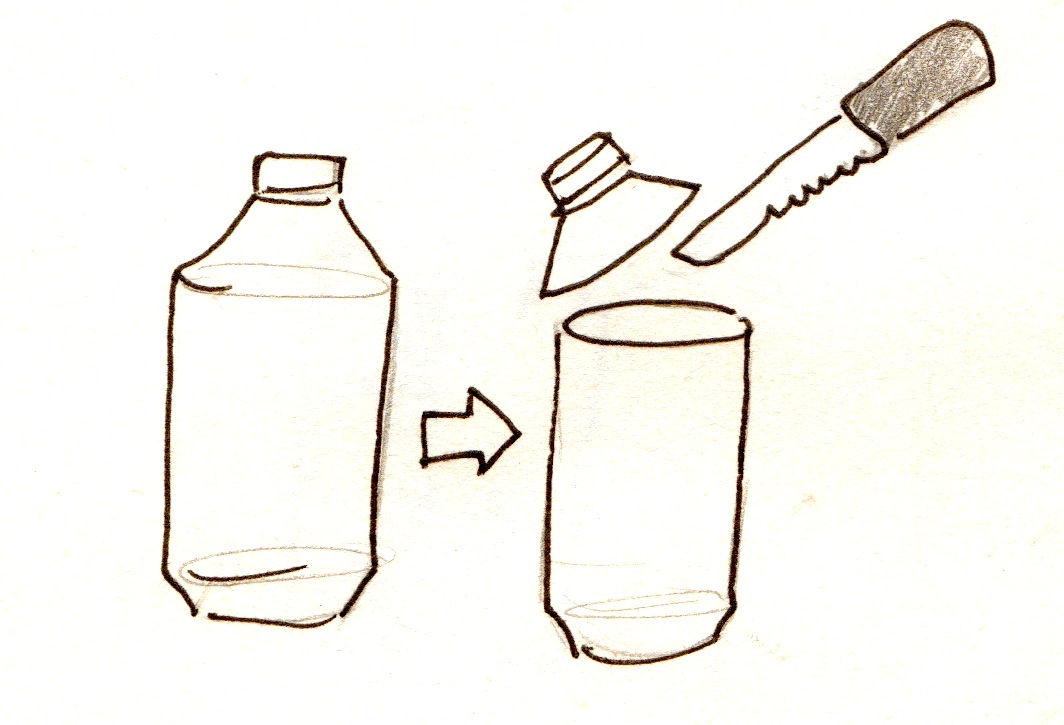
- Cut the top off the plastic bottle so that it is the same height as the can
To make the cathode:
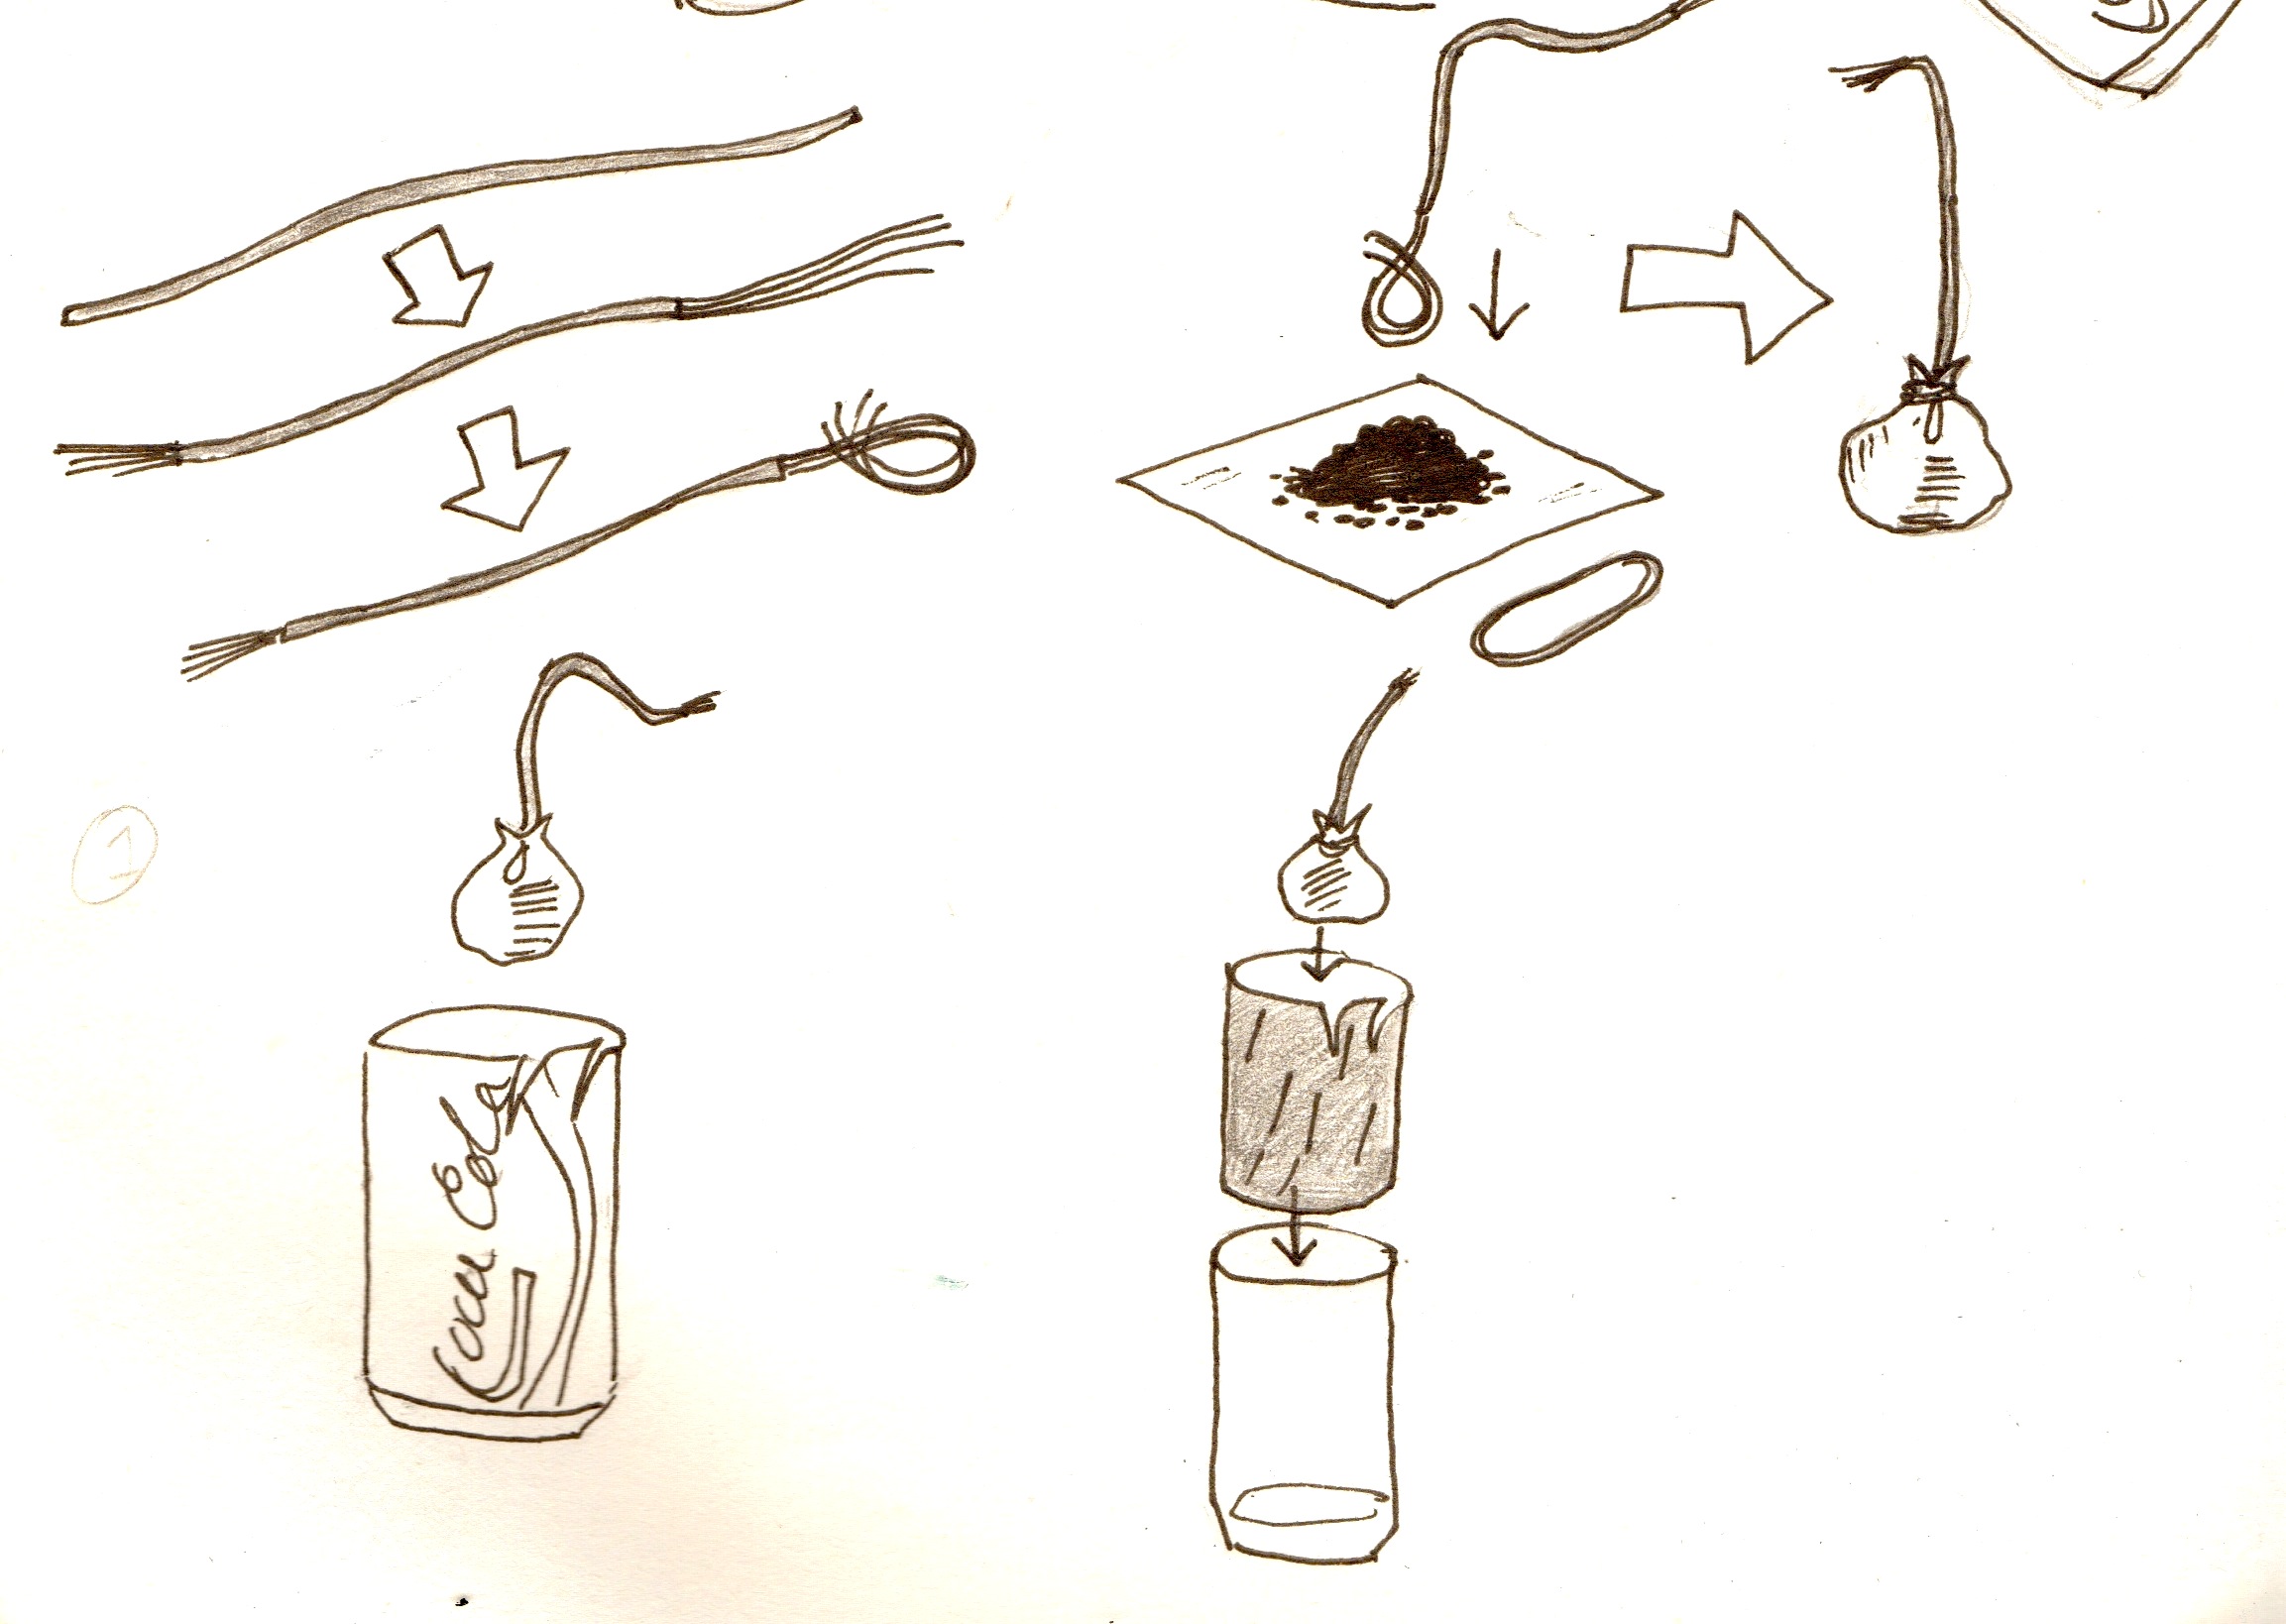
- Get a wire about 6 inches long and strip both ends. Make one stripped end about an inch long, the other about 2 inches.
- Twist the long end of the wire into a loop.
- Put a heap of charcoal on the cloth, put the loop of wire on top of it, and pull in the cloth to make a little bag around the loop of wire. Secure with an elastic band.
Putting the battery together
1. Put the bag of charcoal with the wire in it into the can 2. Get another 6'' piece of wire, and strip both ends. Wrap one of the ends around the tap you cut in the can. 3. If the can is sanded on the outside, put it in the bottle.
Now you have one cell of the battery! These cells do not have enough voltage to power anything significant on their own, so have to be connected together to make a battery that can light LEDs.
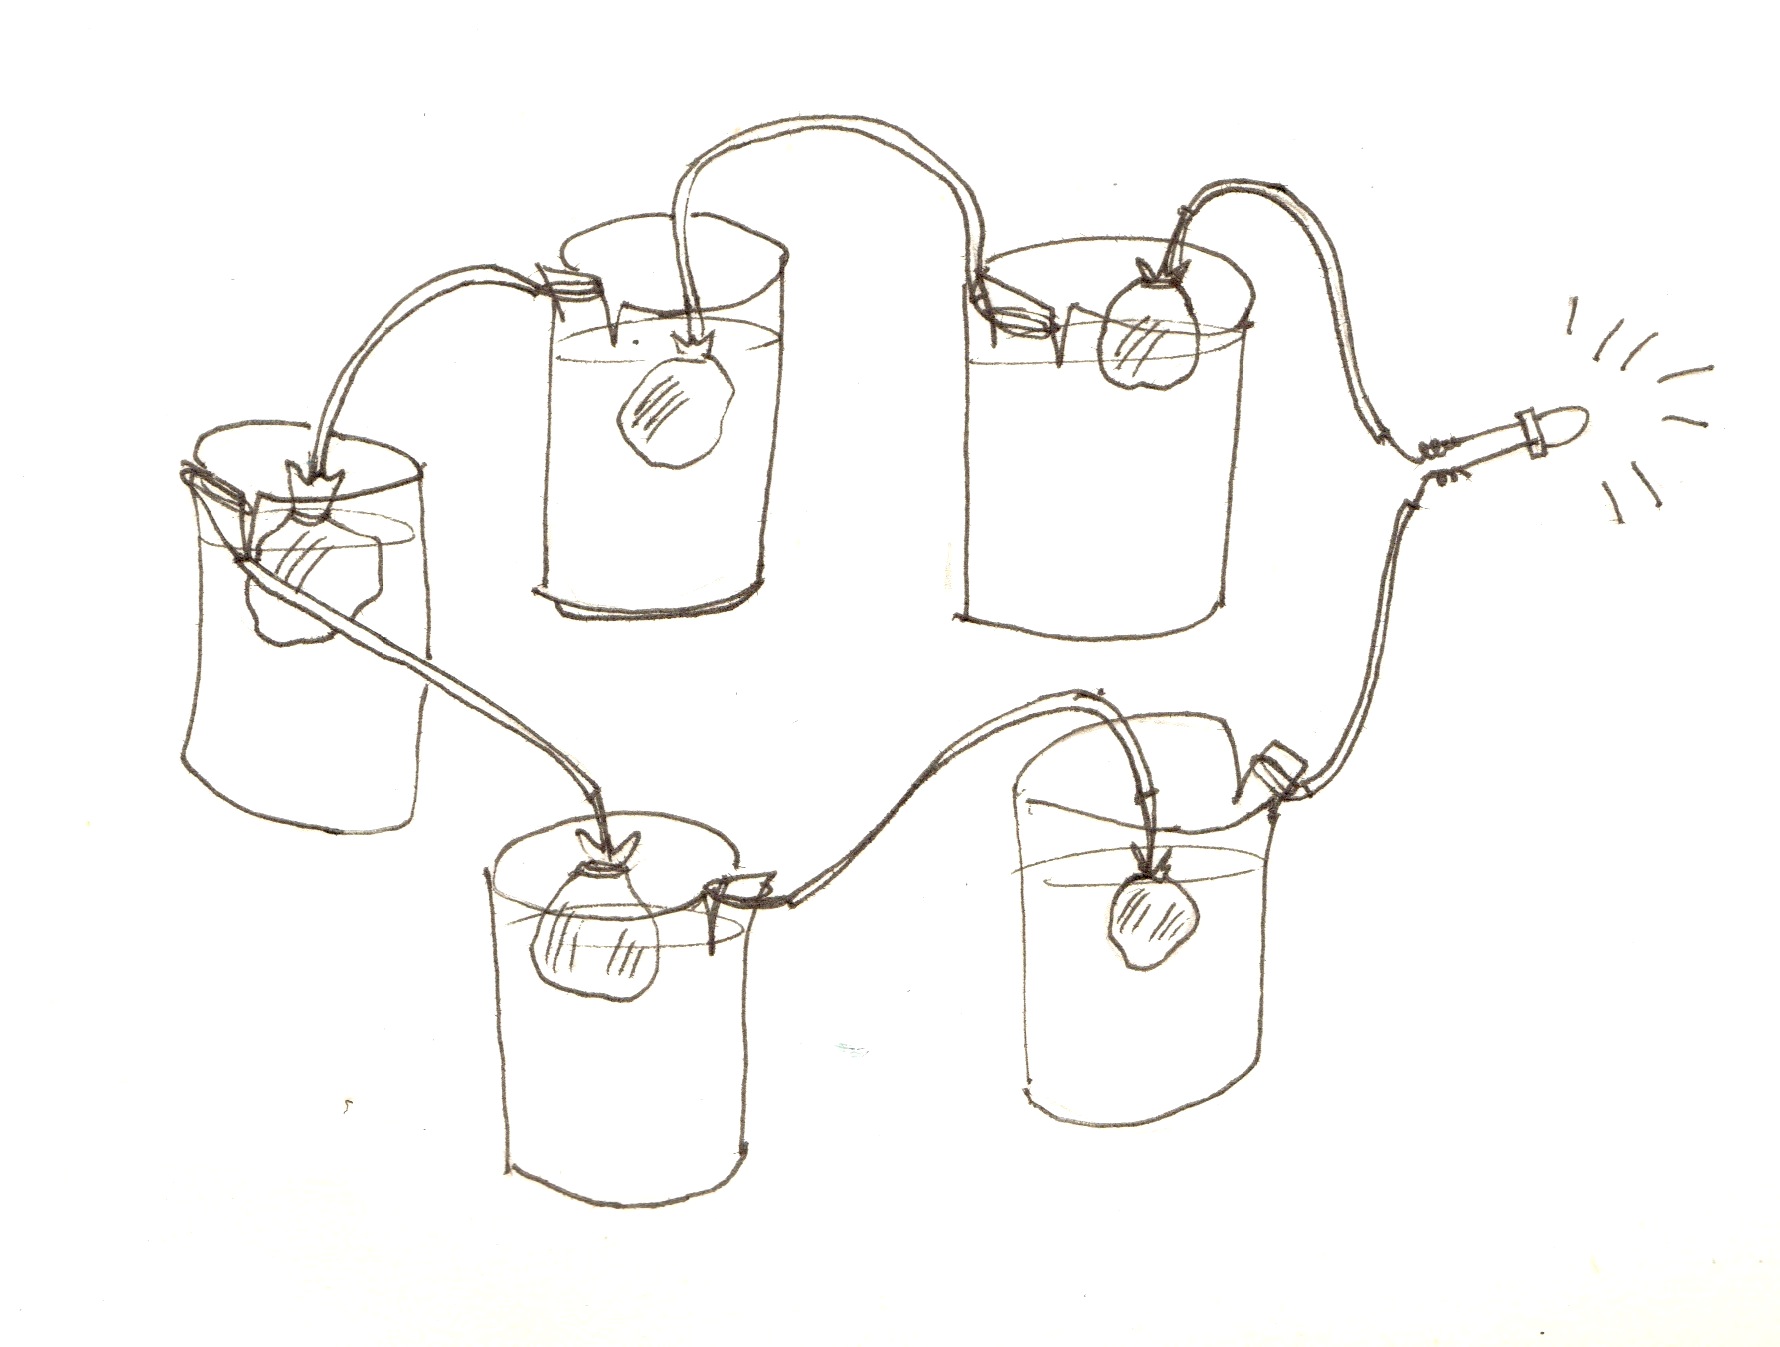
Connecting the cells in series to make a battery:
The cells should be connected as in the picture below – with the cathode wire from one cell connected to to the anode of the other.
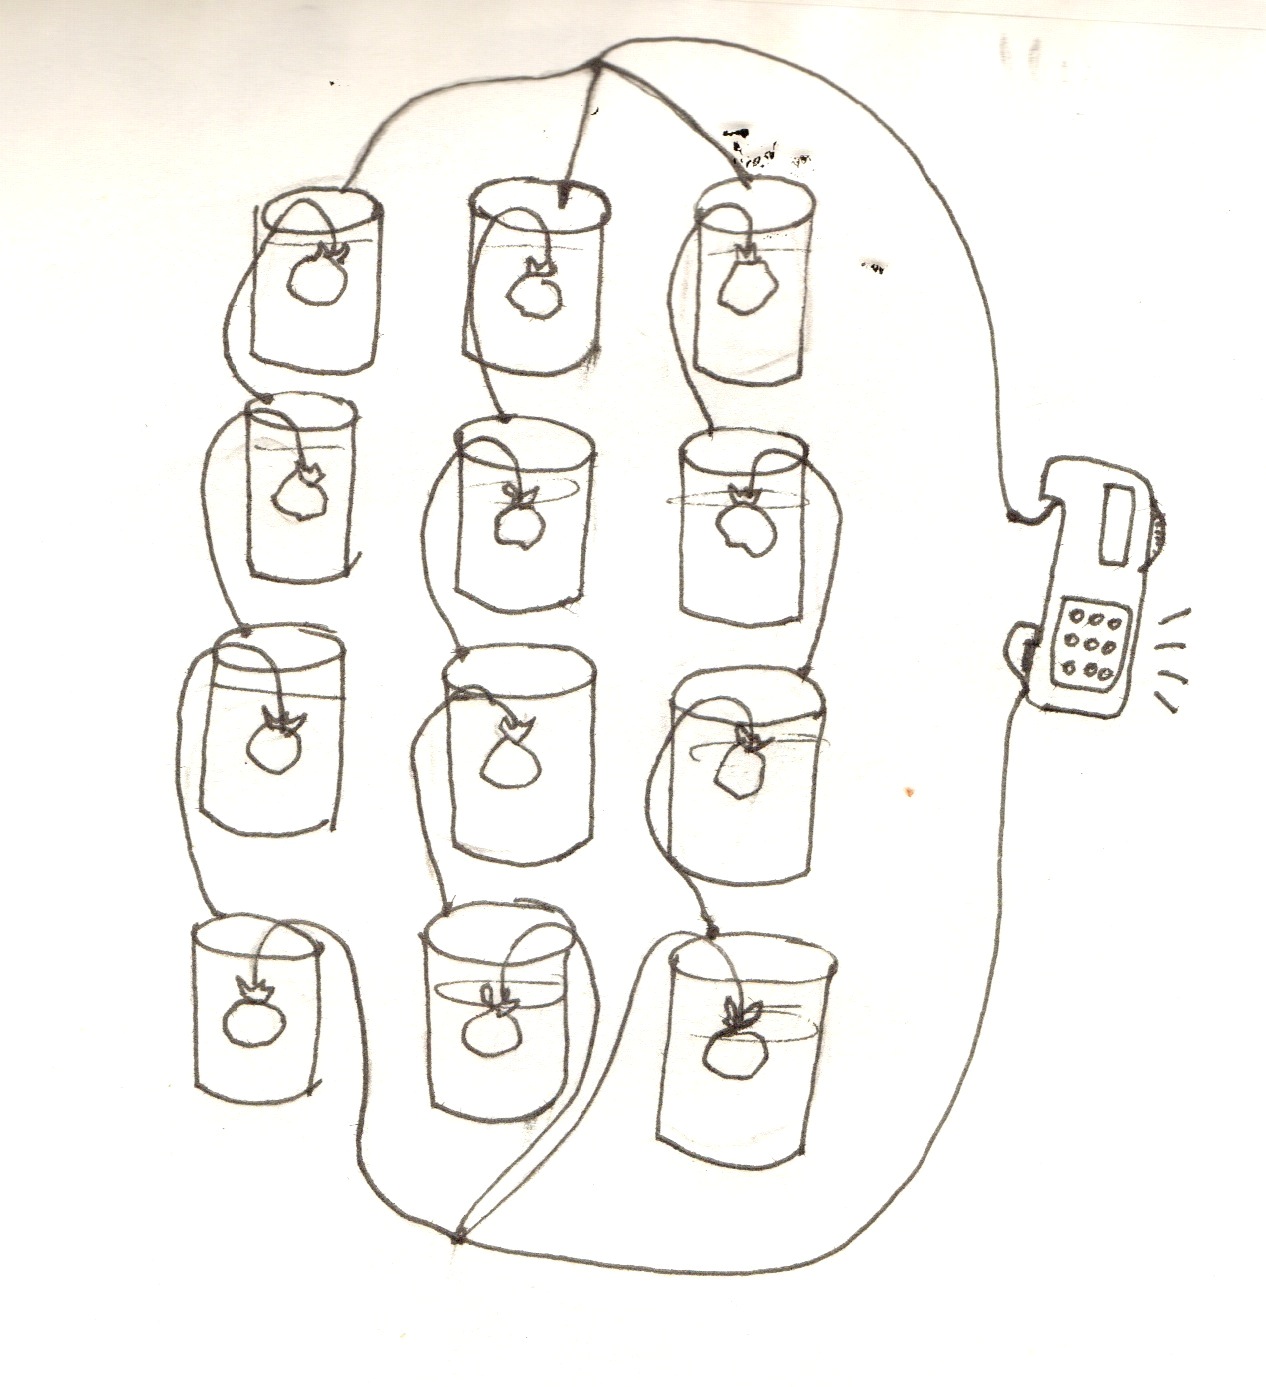
Connecting the batteries in parallel:
Connected with long wires to a small device (e.g. radio) as in the picture below. N.B. - this does not always work well!
How to run the experiment
General tips:
- Sanding the cans is takes a long time, and if it is not done properly the batteries will not work. You might want to sand them before the lesson and give them to the students already sanded.
- Make one cell beforehand to show how the batteries are supposed to look (this isn't a design lesson, so it's allowed!), and use this as the basis of the drawings on the board. It also gives you practice at making the battery.
Making the Cells:
- Work out beforehand how you are going to get all the materials to each pair of students. This is much easier if you have teaching assistants!
- The reaction will work best the more surface area of aluminium is exposed, so make sure the cans are well sanded.
- It also works better the more copper wire is exposed inside the charcoal.
- Make sure that the wire wrapped around the aluminium tab is touching a sanded part of the tab, or the electricity will not conduct.
- The batteries work best soonest after they are made, and tend to lose effectiveness over time. Make sure you do the rest of the activities quickly after that batteries are made! If a battery has stopped working well, stirring the salt-water around and scraping the side of the can might revive it for a while. I
- If you have a voltmeter available, use this to check if students' cells are working properly (i.e. if there is a voltage being created. Between 0.25V and 1V is normal).
- If they are not, the cans might not be well sanded, there might not be enough water between the plastic tub and the can, or there might not be enough salt.
- Sometimes, depending on how well the cans are sanded and how salty the water is, one battery will be able to light an LED by connecting the cathode wire (the one attached to the charcoal bag) and the anode wire (the one wrapped around the can tab) to the ends of an LED.
Making the batteries:
- Once they have made their cells, the students will probably wonder why their individual cells cannot light an LED. Explain that this is because the cells do not have enough voltage on their own, but that they can be connected together to make a battery. (This is what goes on inside a normal AA battery too!)
- Explain about series connection and how this adds up the voltage (see 'How-to-Teach'). Choose pairs of students to come to the front of the class and connect their batteries together until they can light an LED.
- It is much easier to do this is you have a voltmeter or multimeter. Check the voltage coming from the connected cells to see when it is enough to light an LED (this will be about 2-4V depending on the LEDs).
- If there are problems getting enough voltage, check that all the tab connections are secure and touching a sanded part of the can. Check that none of the batteries are shorting (i.e. wire from cathode touching the can of it's own battery.
- After the demo, disconnect that battery and split the pairs of students into groups of 4 or 5 pairs. Give them some LEDs and have a “race” to see which group can light the most LEDs first.
Connecting the batteries in parallel :
- Once the students have all created connected chains of batteries that can light an led, try connecting all of them together in parallel. If you have a very small device – such as a radio or clock – that uses more current than an LED, it may be able to be powered by this. (Always check the voltage for this first, because it sometimes does not work!)
Demo: Magnets to demonstrate different charges
In order to understand how the batteries work, it's important that the students know how positive and negative charges behave. To show this, you can do a simple demo with two magnets.
Materials:
- Two magnets
- Paper, sharpie, or some other way of labeling the different ends of the magnets
- A smooth surface (e.g. tabletop) that the students can see.
- Get the two magnets and find a way to label the ends of each with + and – negative signs.
- Explain that each magnet has one end that is positively charged and one end that is negatively charged/
- Show the students how the similar ends (e.g. + and +) will repel each other by putting one magnet on the table and “pushing” it around with the other magnet.
- Then show how the opposite ends of the magnet attract by “pulling” one magnet along with the other.
- This is a good way of explaining that the electrons (negative charges) in the current are being “pushed” around by something.
Background Information
Basic Circuits
A circuit has to be a complete connected “circle”, with no breaks. Electricity is caused by negative charges called electrons moving through this circle. When these charges move it is called a current Batteries provide the energy to move the charges (create the current), and the moving charges go through devices in the circuit like lamps to make them work.
See link: http://science.howstuffworks.com/environmental/energy/circuit.htm
Inner workings of the battery
Main concept: the battery turns energy chemical reactions into electrical energy by using the reactions to push charges around.
See link: http://electronics.howstuffworks.com/everyday-tech/battery2.htm
- As shown in the link, electricity is made from a battery by negative charges called electrons flowing from the anode to the cathode. The anode produces electrons and the cathode takes them in.
- In the salt-water batteries, electrons are produced by the chemical reaction of aluminium with hydroxide ions in the water. This is an oxidation reaction. The half-reaction is:
Al+3OH- → Al(OH)3 + 3e- + -2.31 V
The reaction uses aluminum and hydroxide, and produces a solid called aluminum hydroxide, plus electrons. After some time, the aluminum hydroxide will build up on the surface of the aluminum, leaving less of it exposed to the water to react. This is one of the reasons why the batteries stop working after a while if the aluminum hydroxide is not scraped off.
The reduction half-reaction at the cathode is:
O2 + 2H2O + 4e- → 4Oh- + +0.4V
This takes in the electrons that the anode has made, combines them water and creates more hydroxide. Because the anode reaction is producing electrons, and the cathode reaction uses electrons, the electrons want to go from one to the other. If a wire is connected between the anode and cathode, the electrons travel along this, creating a current.
The total reaction is:
4Al + 3O2 + 6H2O + 4e- → 4Al(OH)3 + 2.71V
However, because of inefficiencies, salt-water batteries might only reach around 0.7V
The electrolyte
http://en.wikipedia.org/wiki/Electrolyte#Electrochemistry
negative charge cloud… Main concepts: The electrolyte is something that effectively “closes the gap” in the circuit between the anode and cathode, because it too is made up of moving charges. In the case of this experiment, the charges are salt ions (link to salt ions!). If it were not for the electrolyte, when enough negative charges (electrons) gathered at the cathode, the other electrons would no longer want to go there. But the positive ions in the salt water move to cancel out the buildup of negative charge, so the electrons still want to go there, and so the current continues.
“How-to-Teach” Concepts
Positive and Negative Charges
(see Positive and Negative Charges demo in the Experiments/Demo/Building section)
- Make sure that students understand how charges behave, otherwise they won't understand very much of the rest of the lesson!
- A good analogy is that the battery is “pushing” current around the circuit, in the same way that the magnets in the demo pushing each other around.
The Inside of the Battery
- Food analogy: Anode produces electrons (like cooking food) and the cathode eats them. This is useful if you can't explain the chemical reactions.
- Board diagrams are good! Especially if you can have positive and negative signs on magnets/whiteboard/stickers that you can move around a board.
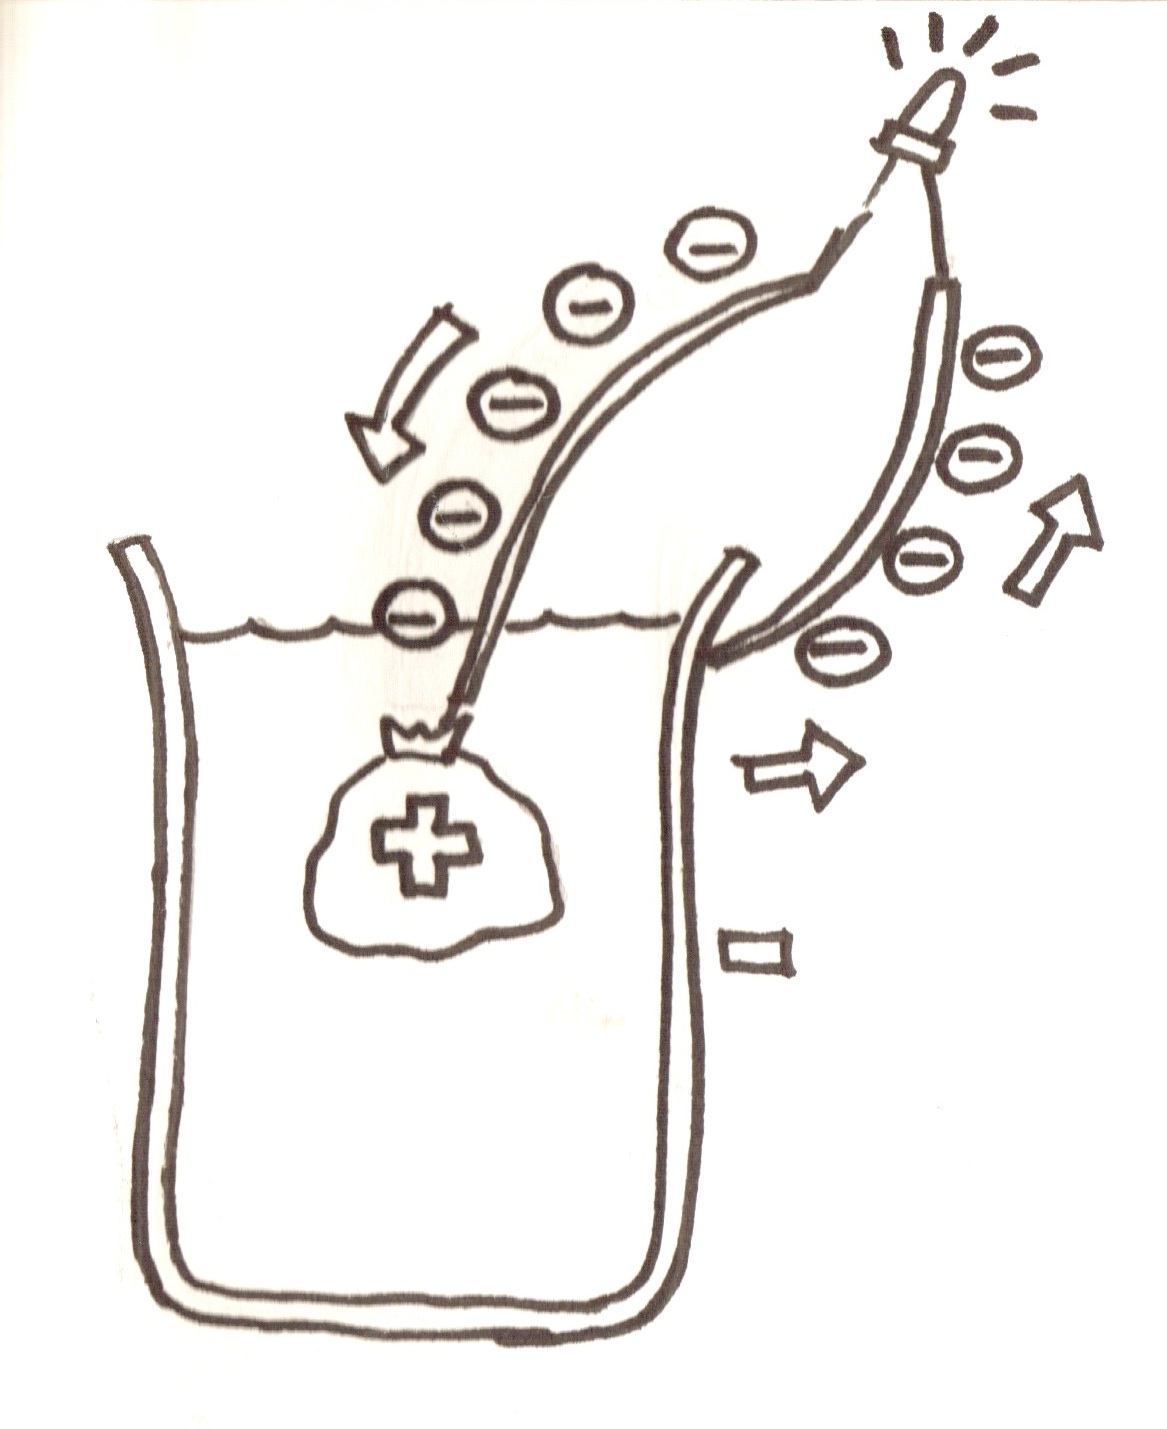
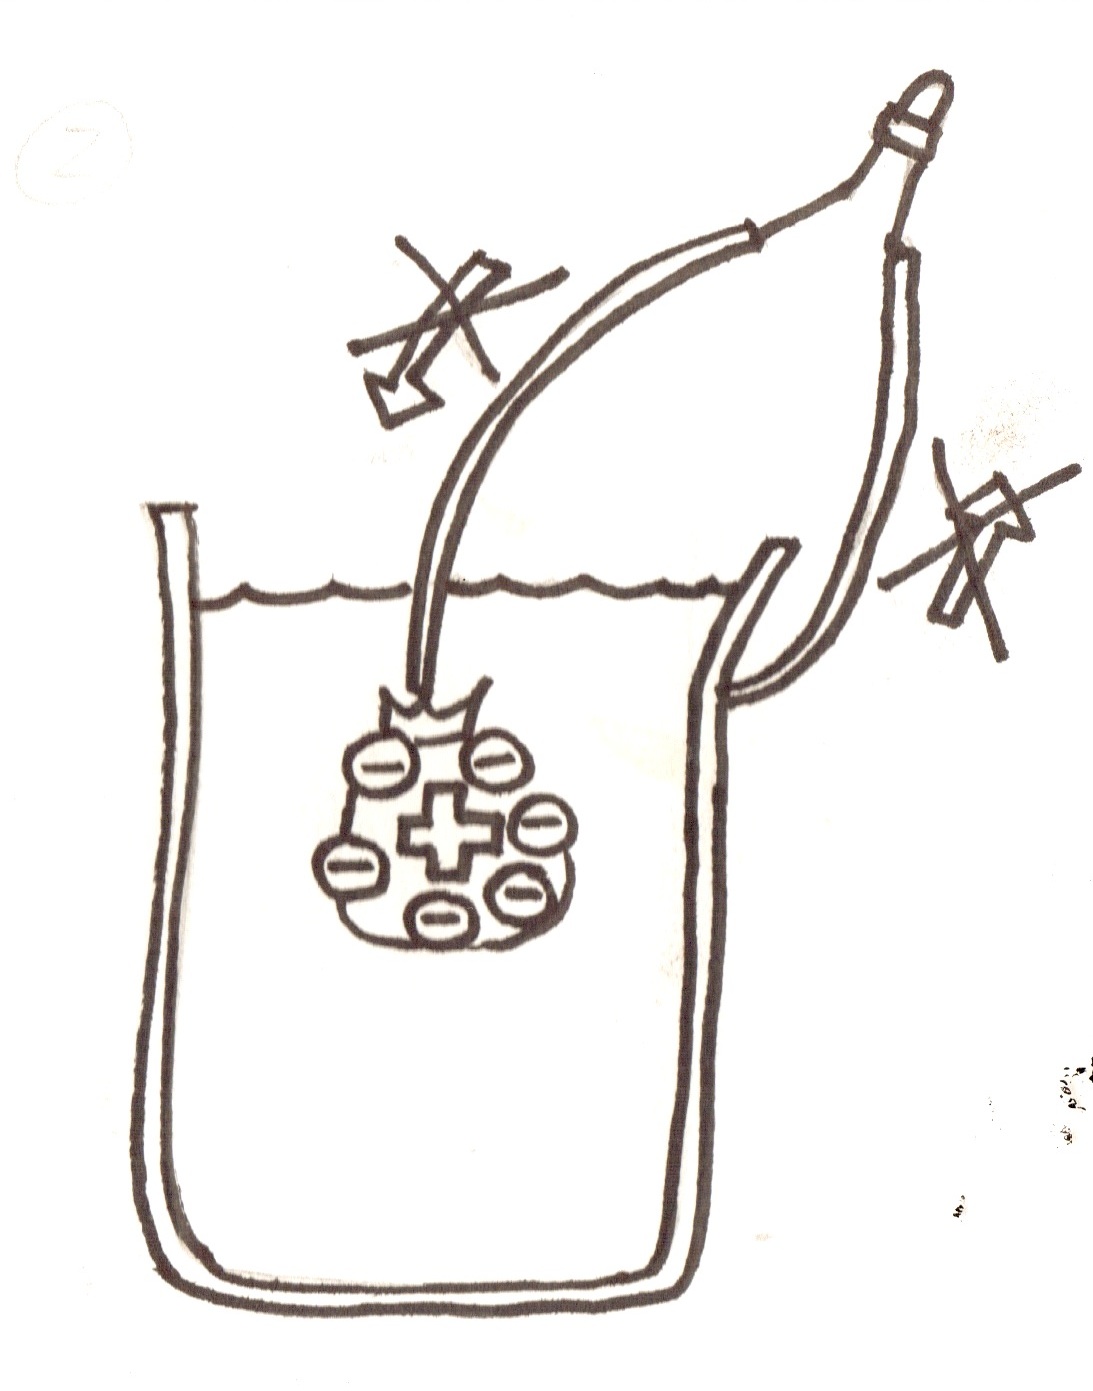
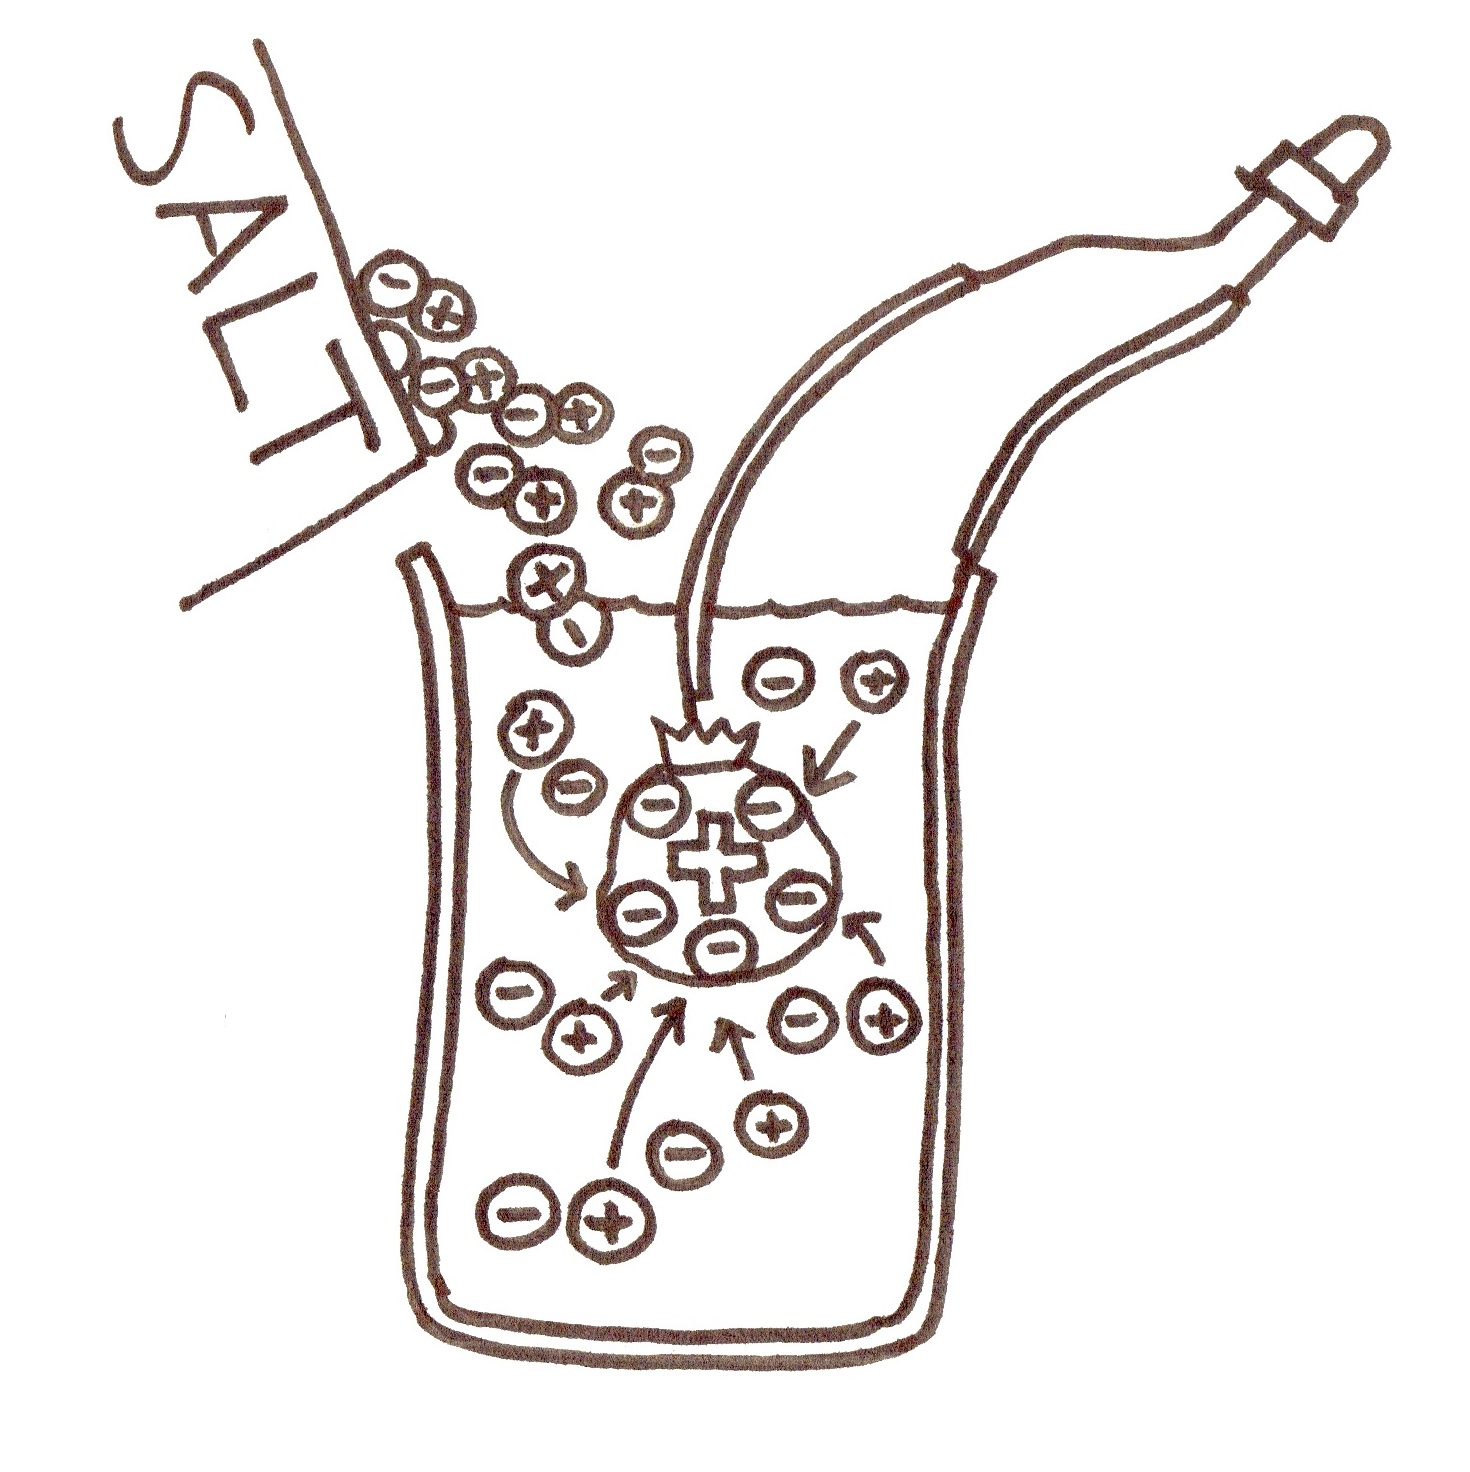
- Below is a comic of how the inside of the battery works!
1. Draw a diagram of the salt-water battery on the board, and of a normal battery (have live demos of each too)
2. The anode (negative terminal, the can) produces electrons, and the cathode uses them. They travel from the anode to the cathode through the wire, lighting the LED.
3. But, after lots of negative electrons go to the cathode, the electrons from the anode don't want to go there anymore (because similar charges don't like each other).
4. This is why we add salt! Salt is made of lots positive and negative charges called ions. Normally these are bonded together, but when put in water they can float away from each other.
5.
Suggested board drawings:
The electrons want to move from the negative (which they do not like) to the positive (which they do like). They cannot travel through the water themselves. But what happens if you connect a wire from the positive to the negative terminal? (The electrons can through it!)
But – what happens when lots of electrons have gone to the positive side? It becomes more positive. If you were an electron, would you still want to go there? (No!)
That is what the salt is for! Explain that salt is made of lots of positive and negative charges stuck together. When it is a solid, they cancel each other out, so it does not have any overall charge. However, when it is dissolved in water, the positive and negative charges separate, making lots of little floating charges. (draw them inside the battery) Where do you think these go? (draw the positive charges going to the cathode). These go to the cathode so that they cancel out the negative charges that have gathered there. Electrons want to go to the cathode again! This way, the electrons keep flowing around, and this is a current.
Local Research
Look for places to get LEDs. Cheap flashlights are a good one, but make sure whatever it is is reasonably accessible to the students. Even if it's more practical for most of your LEDs to come from a different source, make sure you have one e-waste or cheap electronics you can show the students how to remove LEDs from if they want to.
